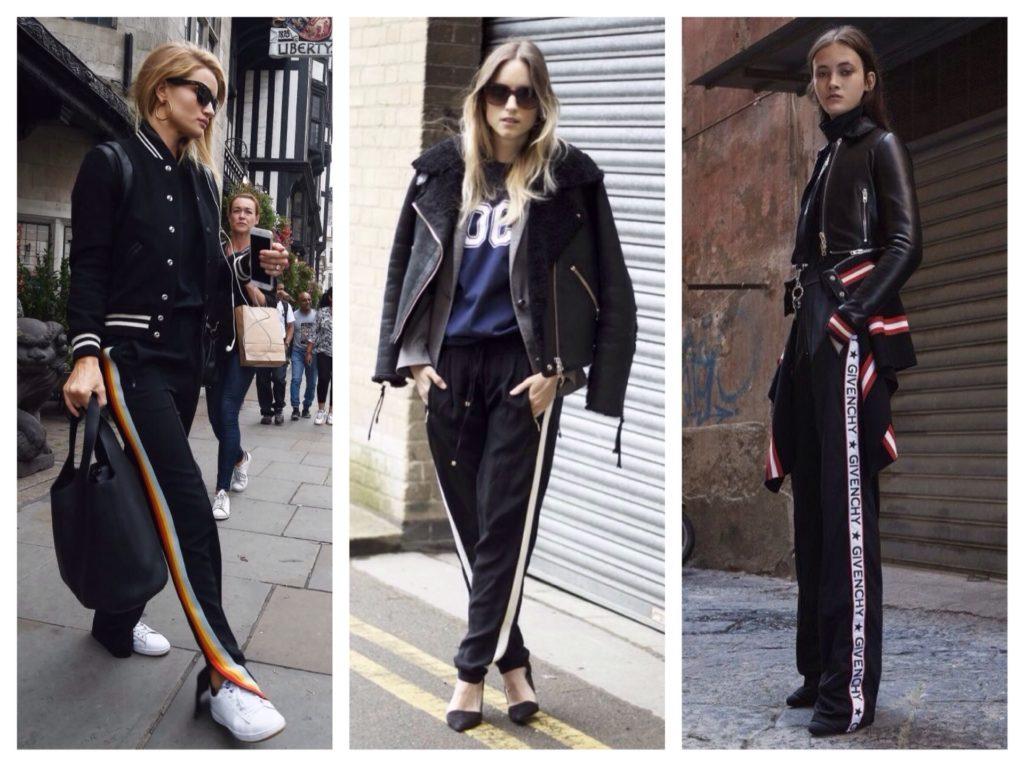
Modern fashion offers not only exquisite, but also comfortable things. The question of what to wear with trousers with stripes is relevant for those who want to be in trend. Once upon a time, such clothing was part of the military uniform. Later, stripes could be seen on sweatpants. And the attribute of the evening set is trouser suits with a tuxedo. Over time, with the light hand of the Chloe design house, they migrated into everyday life.
Model Variations
Stripes are vertical stripes on the outside of the trousers. Although today designers offer original models with a stripe on the inside.

In haute couture outfits

In catwalk sets

They have not lost their relevance for several seasons. The most famous fashion designers offer options on the catwalks in different colors and styles.

Podium sets
The following models can be seen in the outfits:

Who are they suitable for?
The advantage of trousers with stripes, the women's models of which are varied, is that beauties with any type of figure can wear them. Any style will suit girls with ideal shapes. Skinny trousers will look very impressive. For fuller hips, consider wide, structured styles with arrows.

Urban celebrity outfits
Such trousers look good in military style. You can combine them with a parka as outerwear and.

Military style
Those who want to hide any flaws should approach the choice of clothing more carefully. It is worth remembering that stripes can visually lengthen your legs, especially if you complement the set with high-heeled shoes.

With a trench coat
Wide, floor-length trousers will add height to a petite girl. Straight cut models can be considered universal, because they suit everyone.

Contrasting combinations
Looks with pants
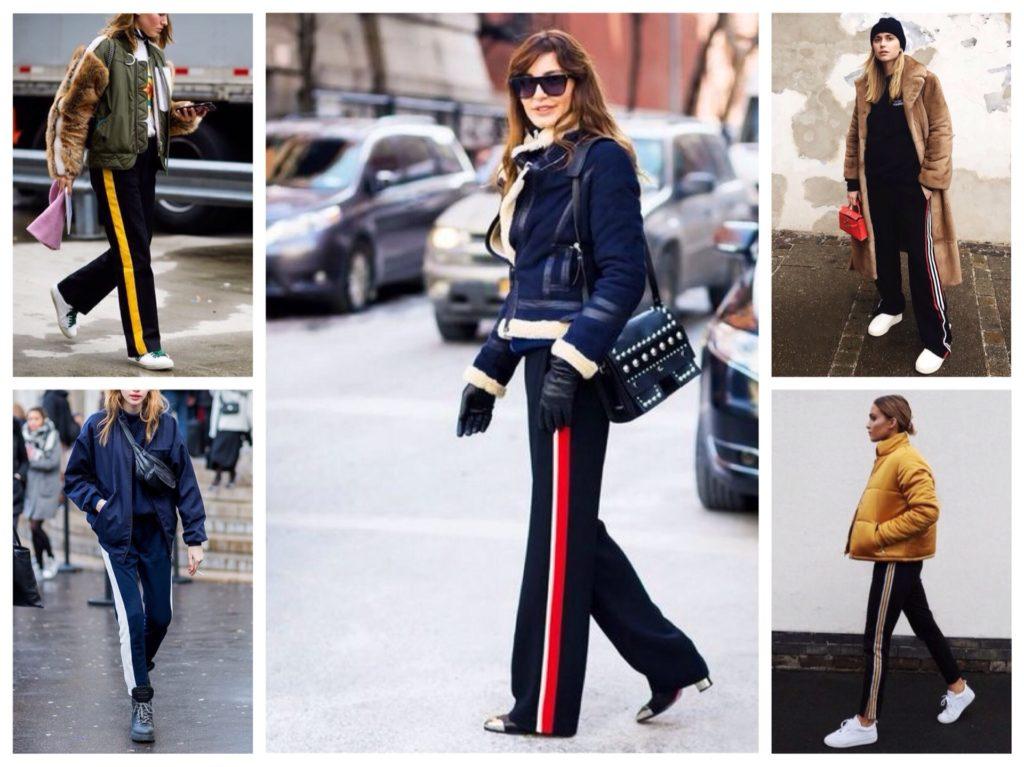
Trousers with stripes differ not only in a variety of styles, but also in colors. The imagination of designers is almost limitless.

Loose trousers
Neutral shades
The most popular are neutral shades: black trousers with white stripes and vice versa, white with black. Such options are appropriate in any style.

Black + white
If the office dress code is not too strict, then these trousers are suitable for a work environment. It is recommended to complement them with pumps, a blouse and a jacket.

Business images
A thin white stripe on black trousers is not too noticeable, but will liven up a standard one.

Part of the trouser sets
You can wear these pants to a celebration; there are also models for sports. Also, lovers of soft colors should consider beige or black stripes.

Flowing models
Bright colors
Designers also offer more contrasting models. or with stand-out snow-white stripes look bright and stylish.

Red+black

Black + red

Dark blue + red

Bright blue variations

In shades of green

In yellow-orange colors
Yellow, green, and red stripes look interesting on snow-white pants.

Variations with white
Leading fashion houses do not forget about gold and silver, which are now in trend. Shiny trousers with a dark stripe are suitable for a formal event. And for every day you can choose jeans with golden stripes.

Ideas stripes
It is also worth paying attention to models with multi-colored stripes. In such cases, two or three strips of different shades are sewn. They look especially impressive on a dark background, black or blue.
Demi-season looks
What to combine with
An interesting feature of pants with stripes is that they can be combined with a wide variety of wardrobe items. You just need to consider what kind of image you want to get in the end.

T-shirts and are a great option for a sport-chic style. Statement shoes or high-heeled sandals, and, if desired, a baseball cap will complete the set.

In a sporty style
If you are in the mood for casual wear, then you can try combining trousers with white sneakers or sneakers. But you should be careful - trousers with stripes in an overtly sporty style are considered bad manners.

Sports chic celebrity
These trousers look good with blouses, tops and shirts. These are the best options for going to the office or to a party. The top should be chosen to match the stripes or the pants themselves, then the legs will visually stretch out and appear slimmer. Shoes must be the same color. It is only important that the length of the trouser legs is not excessive, otherwise the effect will be the opposite.

An office set of pants with stripes, a blouse and a jacket in a neutral color will effectively complement the scarf.
Blouses help get rid of the feeling that a fashionista is wearing sweatpants. The image acquires femininity. Complete it with a jacket or blazer and heels. In such sets, styles reminiscent of classic ones are appropriate. Tops also remain relevant. A combination of high-waisted pants and a crop top will be especially successful.

In a duet with a coat

Looks with a coat
Pants with stripes that are tapered at the bottom look original. With them you can create a romantic look, combining them with a chiffon blouse.
In cool weather, you can throw on a coat or even a down jacket. Sweatshirts and sweaters are also appropriate. Moreover, there are no restrictions; the sweater can be, for example, chunky knit or knitted. As for footwear, you should give preference to ankle boots, and if the model of the pants is narrow enough, then boots with a wide top are also suitable.
During the cold season
By wearing trousers with stripes, the fashionista shows her readiness to experiment. This current wardrobe detail requires a special approach. A sense of proportion will help create an unusual and memorable image.
Difficulty level: JUST
TAPERED TROUSERS WITH STRIPES
INSTRUCTIONS FOR PRINTING PATTERNS AND SEWING SEQUENCE
Constructive additions: to the waist circumference - about 28 cm (the width along the waist line is approximately (Ob+1cm); to the hip circumference up to size 50 - 7.5 cm, from 52 to 58 - 9 cm, from 60 - 11 cm.
Material recommendations: main - mixed materials containing elastane fibers and threads (highly tensile), plain or with a “cage” pattern, stripe; finishing - knitted fabric or special knitted braid or base material with a check pattern, stripe when changing the direction of the warp thread (pattern) or plain.
When ordering a pattern you receive 3 pdf files:
- A file with instructions for printing a pattern, containing a control square and the measurements according to which the pattern was constructed;
- File with pattern in A4 format, for printing on a regular printer
- File with a pattern on one large sheet - for printing on a plotter
Pattern sample:

* PRINTING ON A4 FORMAT PRINTER:
When printing patterns in A4 format, open Adobe Reader and check the "Actual size" checkbox (or uncheck "Fit to page size") in the print settings.
Note the test square (or grid) on the pattern sheet. Its size is exactly 10 by 10 cm. It is needed in order to understand whether the printing scale is set correctly on your printer. Before printing the entire pattern, print out a sheet with a red square and measure it. 10cm sides? This means you can print the remaining sheets of the pattern. If the sides are more or less than 10 cm, you need to adjust the print scale of your printer. Otherwise, the pattern will not print correctly.
After printing all the pattern pages, glue them together in the order shown: the letters (A/B/C+) indicate the column, and the numbers (01/02/03+) indicate the row. The first (top left) pattern sheet will have the number A01.
*PRINTING ON A PLOTTER:
When printing a pattern on a plotter, open the pattern file in Adobe Reader (or Foxit Reader). Click on the "File" menu item, then select "Print". Select the Poster print mode under Page Sizing and Handling. Make sure the Segment Scale field is set to 100%. Check the boxes for Cutting Marks, Shortcuts, and Split Large Pages Only.
The following designations are used on the pattern:
.png)
Parts Specification
- Front part - 2 parts
- Rear part – 2 parts
- Facing the upper edge of the front part – 1 piece
- Facing the upper edge of the back part – 1 piece
- Lampas – 2 parts
- Pocket burlap – 4 pieces

When cutting, add allowances for all connecting seams - 1.0 cm. There is no need to give a seam allowance for the bottom edge of the trousers and the bottom edge of the facings, because these sections will be overcast.
Material consumption when laying out parts according to the diagrams indicated below depends on the size of the product, the width of the material, as well as the possibility of laying out parts in different directions, the need to adjust the “cage” pattern along the side sections of the trousers, etc. Average material consumption when cutting all parts in one direction for sizes 44/46 - 1.2 m, for sizes 48/54 - 1.3 m, for large sizes and heights material consumption is 1.8-2.0 m with the width of the material not less than 150 cm.
The consumption of material for cutting stripes depends on height. The figure shows the length of the part for heights 164-176. To save material, they can be cut in the transverse direction, if the location of the pattern suits you.
Options for laying out parts when cutting parts in one direction with adjustment of the pattern along the side sections

In addition to the main material for making trousers, you will need:
- wide elastic band “elastic band” – 1.5-2 m;
- finishing cord – 1.5 – 1.8 m.
Technological sequence for processing trousers
Baste and then stitch the pocket burlap pieces to the front of the trousers following the reference marks (Stitches 1 and 3, Fig. 1). Stitch the edges (Stitches 2 and 4, Fig. 1). Sew the seam allowances onto the burlap (Line 4, Fig. 1) and onto the front of the trousers (Line 5, Fig. 1).
Baste and then stitch the pocket burlap pieces to the trouser stripes following the reference marks. Seal the cuts. Topstitch the seam allowances onto the burlap.
Baste and then stitch the stripes to the front of the trousers while basting and stitching the pocket burlap parts. Seal the cuts.
Baste and then stitch the stripes to the back of the trousers (Stitch 9, Fig. 1). Stitch the cuts (Line 10, Fig. 1).

Rice. 1
Attention! The seam allowances for attaching stripes to the back of the trousers should be pressed back, and the seam allowances for attaching stripes to the front of the trousers should be pressed to the front. You can sew the seam allowances on the back and front parts respectively using a finishing stitch (Stitch 11, Fig. 1).
Baste and then sew the trouser parts along the individual sections. Overcast seam allowances.
Baste and then stitch the right and left sides of the trousers along the middle edges. Overcast seam allowances.
It happens to you that you bought an item, everything seemed to be fine in the store, but for some reason you no longer liked it and the clothes are collecting dust in the closet. This happened to me with the trousers that I bought at Gloria Jeans on sale; they became a victim of my greed. I don't like hoarding junk, so I'll give them a chance with a little remodeling.
Now it has become fashionable to wear pants with stripes, but I don’t yet have clothes with such a feature, so my today’s tutorial is how to sew stripes to ready-made trousers. As a result, I got something that I like, fits perfectly on my figure and I will definitely wear it!
This is what my pants looked like before the alteration. What didn't suit me? The fact that they fit tightly, like leggings, although they were my size. I wanted to make them a little looser and give them a sporty look so that they could be worn with sneakers or sneakers.

How to sew stripes to ready-made trousers
For the alteration, I needed a fabric that was closest in composition and quality to the material of the trousers; I took a thick suit. Also, this fabric should not be stretchy or stretchy, because I will not cut according to the rules, but precisely along the transverse one. In order to calculate the fabric consumption for stripes, you need to know the width of the future insert:
Fabric consumption = stripe width*2 + 4 cm (allowances for cuts)
I also had on hand such sewing tools as a seam ripper, tailor's pins, scissors, measuring tape, chalk, a sewing machine and an overlocker.

01. I take my trousers and, using a seam ripper, remove the waistband and completely unravel them along the side and bottom sections.


02. I cut out stripes - strips of fabric with parameters 6*100 cm, that is, when finished, my stripes will be 4 cm wide, and the length will be equal to the length of the trousers along the side cut.

03. Using tailor’s pins, I alternately pin the stripes to the side sections of the front and back.

04. I sew the stripes to the trousers, there should be four lines in total.
I overlock the seams with an overlocker; you can also use a zigzag stitch on a sewing machine to prevent the cuts from fraying.

05. I direct the allowances along the cuts inside the stripe, baste, and iron with an iron through the iron.


06. I sew the belt back into place, bend the bottom by the amount of allowance and sew it with hidden stitches, because there should be no visible stitches in the product, unless they are finishing ones.
In general, at this step my modification of how to sew stripes to trousers is finished. It took me exactly 2 hours, during which I received a wearable fashion item. Isn't this a great result!

Ready-made pattern of tight-fitting trousers with stripes for overweight people
You get three pattern sizes at once.
The pattern is given in three full-size sizes without seam allowances.
Hip circumference 116-120-124cm. See the table for other parameters.
Comfortable and fashionable tight-fitting knitted trousers with stripes on the sides. Using this pattern, you can sew trousers for work and home, for sports, etc. The scope of application of such trousers can be expanded endlessly.
For sewing you will need approximately 1.4-1.6 m (depending on the size) of elastic knitwear with a width of 1.5 m. Anyone will do elastic material, for example, fleece, jersey, velor or plush, footer, etc. For stripes, you can use eco-leather, thick elastic satin or other material suitable for the main material.
The pattern is sent instantly by email (to your e-mail address). The file with the pattern is included in the email attachment. You open it, print it on a regular printer, glue the sheets together, cut out the pattern pieces and you can start cutting.
To be able to print the pattern several times, save the file to your computer.
Note: First, print one sheet with a reference square of 10x10 cm. Check that its sides correspond exactly to 10 cm. Achieve this using the settings of your printer. Now you can print out all the pattern sheets and assemble them into one puzzle, according to the pattern, using narrow tape or an adhesive stick.
Before cutting out your pattern pieces, take a tape measure and compare your measurements to the pattern's measurements.
Please note that the pattern is designed for stretch materials with a minus increase.
Check your waist and hip circumferences, the length of the product, take into account the degree of elasticity of the material from which you are going to sew trousers.
When determining the optimal size for yourself, be especially careful about measuring your hip circumference and only then cut out the pattern pieces.
Uncover
The pattern is given in three sizes in full size without seam allowances
Cut by first folding the material face to face and allow seam allowances.
For stitched seams, it is enough to give 0.7-1 cm when cutting, and 2-3 cm for hemming the bottom.
- Front half of trousers 2 parts
- Back half of trousers 2 parts
- Lampas 2 parts (cut from finishing material)
- Belt 1 piece with fold
The pattern is designed for a conventionally typical figure. If your figure differs from the conventionally typical one, you should adjust the pattern taking into account the characteristics of your physique and only then start cutting.
Sewing
All sewing operations are accompanied by wet-heat treatment.
- Sew the stripes to the side seams of the front and back halves of the trousers.
- Stitch the step cuts.
- Connect the right and left trouser legs, grinding down the middle sections.
- Sew the cross sections of the belt (into a ring).
- Prepare an elastic band (connect it into a ring). We recommend an elastic band 4cm wide and 86-90-94cm long, according to size.
- Connect the belt and elastic band along the bottom edge of the belt, evenly distributing the tension.
- Fold the belt in half along the longitudinal section and stitch to the top edge of the trousers.
- Treat the bottom of the trouser legs.
That's all the work. With new clothes!
Raxi, here is my tutorial on velvet stripes, I also make satin ones, often without gluing the satin to the main fabric.
I am creating a pattern for the front and back halves of the trousers. I increase the front part along the side seam by ½ of the intended width of the stripe (let the width of the stripe = A), and reduce the back by ½ A. I cut out a strip of velvet with a width of A+3cm.
I retreat a distance (A-1cm) from the side seam markings towards the trouser leg on the front half of the trousers and on the front side I draw a line with a silver gel pen (it washes off well, is thin, and is perfectly visible on black).
From this line towards the trouser leg I glue a mesh on paper 1 cm wide:
to photo hosting →
I glue a strip of velvet:
 to photo hosting →
I attach the velvet at a distance of exactly 1 cm:
 to photo hosting →
I glue a mesh on paper width (A+1) to the velvet allowance and the allowance of the front half of the trousers, thus:
 to photo hosting →
 to photo hosting →
I unroll the velvet and iron it using a working piece of velvet (pile to pile):
 to photo hosting →
 to photo hosting →
On the wrong side of the front half, we once again measure the width of the stripe relative to the laid stitch, correcting errors, and draw a new line connecting the front and back halves of the trousers. Errors, as a rule, always appear:
 to photo hosting →
We cut off the front and back halves of the trousers and stitch along the front half along the new line we just marked.
We iron the stripes using a working piece of velvet, smoothing the allowance onto the back half:
 to photo hosting →
View from the inside:
 to photo hosting →
Front view:
 to photo hosting →
I also started making satin stripes; I really liked the required rigidity and plasticity of the stripes:
 to photo hosting →
The description is long, but both stripes take 30-40 minutes. Instead of a mesh, I somehow just made a web on paper, but the stripes stood up like a stake, were too hard, and it was difficult to lay the web evenly. And the mesh stripes are plastic, keep their shape, but don’t prick, and don’t shrink after washing. And it turns out that I don’t use basting or pins at all, the velvet doesn’t move, which is very important when you need perfect accuracy in the width of the stripes.


